Open topic with navigation
Setting Up Interest Profiles
When setting up interest profiles, you need to add the basic profile information, and then set up and map the profile to an interest policy (or set of rules), and specific account type(s).
Tips and Hints:
- You cannot have multiple profiles per development, but you can have multiple policies for the same account type and time period per profile. This results in interest only being applied once for each policy in monthly processing.
- In order to delete a profile, all developments must be removed from the profile first. Also, all account types must be removed from a policy in order to delete a policy. Once a profile or policy has been used, they cannot be deleted. (Removing all developments and/or account types, however, will make them “inactive.”)
Enter Basic Profile Info
|
1.
|
Click SETUP on the Main Menu screen. On the Receivables Setup screen that appears, select the Profiles and Policies tab and then click INTEREST. The Browse Interest Profiles screen opens with all available interest profiles displayed in a table. |
|
2.
|
Click  on the toolbar. The Add Interest Profile Wizard is initiated. on the toolbar. The Add Interest Profile Wizard is initiated. |
|
3.
|
Enter a description to identify the profile and then check the checkboxes of the developmentsyou want to include in the profile. |
Note: You are only able to have one profile per development. If another profile is added that includes a development for which there is already a profile, the first profile will have that development removed.
|
4.
|
Click NEXT, review the profile information, and then click FINISH to save and add the new profile. The Maintain Interest Profile Setup screen appears with the Main tab selected. |
Map Interest Policy
|
5.
|
Select the Interest Policies tab and click on the toolbar. The Add Interest Policy Wizard is initiated. |
Note: The interest profile that is highlighted on the Main tab of the Maintain Interest Profiles screen is the profile to which you are associating a policy.
Caution! Be careful to not create redundant policies for the same account type and time period.
|
6.
|
Enter the name for the interest policy in the description field and select the type of calculation to use from the drop-down list. |
|
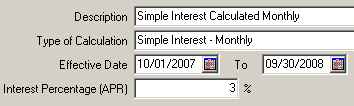
7.
|
Select an effective date, or the date range of when the policy is in effect, and enter an interest percentage (APR). For example: |
|
8.
|
Click START, review the policy’s information, and then click FINISH to add the new policy. The Interest Policies tab of the Maintain Interest Profile Setup screen appears again. |
Map Account Type(s)
|
9.
|
Select the Account Types Included sub-tab at the bottom of the screen. |
|
10.
|
Click to add an account to the new interest policy. The Add Account to Interest Policy Wizard appears. The interest profile and interest policy you just added is displayed on the first screen of the wizard. |
Note: The interest policy that is highlighted on the Interest Policies tab of the Maintain Interest Profiles screen is the policy to which you are mapping an account type.
|
11.
|
Select the account type to be affected by this policy from the drop-down list. |
Now that you are finished setting up the needed information to make an interest application to account(s) possible, you are now able to apply the actual interest to those account types. Applying interest to accounts can be accomplished in the Periodic Processing area of the TAR program. See "Applying Interest to Accounts"
Copyright © Tenmast Software 2011